Wednesday, December 28, 2011

sugar.cookies


You know those really good sugar cookies at WalMart that you never buy because you know you would eat all twelve in one sitting? No? Well...they are the really fluffy cookies with the ungodly amount of icing on the top? Still no?...your loss! 

Seriously though, these cookies are SOOO good! They are fluffy, soft, and have so much flavor. If you are like me and avoid buying the Lofthouse sugar cookies at WalMart because you will eat all of them, then I would suggest only making half a batch of these cookies. I've made them twice and I didn't count how many they made the first time, but the second time around 66 of these babies were baked! I'm really good at sharing, but a week later there are still two dozen sitting in my kitchen. 

Here they are in Christmas form:

SUGAR COOKIES
Recipe from: sweetpeaskitchen.com

Cookies: 
6 cups flour, divided
1 tsp baking soda
1 tsp baking powder
1 cup butter at room temperature
2 cups granulated sugar
3 eggs
1 tsp vanilla extract
1 1/2 cups light sour cream
Frosting: (this is a double recipe because I always use WAY too much frosting) :)
2 cups butter, at room temperature
2 tsp vanilla extract
8 cups powder sugar
12 Tbs heavy cream
Food coloring
Sprinkles

1. In a medium bowl, whisk 5 cups of flour, baking soda, and baking powder; set aside. 
2. In the bowl of a stand mixer with the flat beater attached, cream the butter and granulated sugar at medium speed until light and fluffy, about 3 minutes. Scrape down the sides of the bowl with a rubber spatula as needed. Add the eggs, one at a time beating until each is incorporated. Add the vanilla and sour cream and beat at low speed until combined.
3. Add the dry ingredients and beat at low speed until just combined, about 30 seconds, scraping down the bowl as needed. Dough needs to obtain the right consistency for rolling, so add additional flour, 1/4 cup at a time, until this is achieved (up to 1 cup more flour).  Divide dough into sections. Flatten into rectangles about 1 1/2 inches thick, then wrap with plastic wrap. Chill in the refrigerator overnight. (I added more flour because my dough was still sticky)
4. Preheat the oven to 425 degrees F. Line 2 large baking sheet with parchment paper or spray them with nonstick cooking spray, set aside. 
5. Generously flour a work area and rolling pin. With a rolling pin, roll the dough out to 1/4 inch thickness. Using a 2 1/2 inch round cookie cutter, cut out circles and transfer to a baking sheet. Bake for 7-8 minutes, until pale golden. Immediately transfer cookies to a wire rack to cool.
6. To make the frosting, in the bowl of a stand mixer fitted with the paddle attachment, cream together the butter and vanilla. Slowly beat in the powder sugar. Once smooth and creamy, add in heavy cream, 1 Tbs at a time until the desired spreading consistency is achieved. If desired, add food coloring and beat until combined.
7. Once cookies have cooled completely, frost and add sprinkles. Allow frosting to set, the store in an air-tight container. Let cookies sit for several hours before serving to add the flavors to develop.


Monday, December 26, 2011

cinnamon.streusel.muffins


A lot of the Christmas gifts I received this year were baking related. I got the ever-so-popular cake pop book, spatulas, a cake stand, measuring cups, a recipe book, and these adorable muffin liners! I had to use them at once, so I made cinnamon streusel muffins for Christmas morning. They were a huge hit! 

My mom has an old cookbook from the Methodist church we grew up in, before we moved. It is filled with DELICIOUS recipes. This recipe was actually a coffee cake, but I converted it to muffins, just so I could use these liners! It is super easy and even easier if you convert it back into a cake! Merry Christmas!! :)


CINNAMON STREUSEL MUFFINS

Cake:
1 yellow cake mix
1 box instant vanilla pudding mix
2 Tbs vegetable oil
1 1/3 cups water
2 eggs
Streusel:
3/4 cup flour
3/4 cup brown sugar
3-5 tsp cinnamon
4 Tbs melted butter
Icing:
3/4 cup powder sugar
1 1/2 T milk (or to desired consistency)

1. Beat all ingredients for the cake for 2 minutes at medium speed
2. Spoon batter into muffin pan. (1/4 full)
3. Fill 24 muffin wells. Set remaining batter aside.
4. Combine all ingredients for the streusel.
5. Sprinkle half the streusel mix over batter in muffin wells. Set remaining streusel aside.
6. Spread remaining batter over streusel in muffin wells. (wells should be 2/3 full now)
7. Top with remaining streusel.
8. Bake at 350 degrees for 20-30 minutes. (I didn't time the exact amount, so watch carefully!!)
9. When cool, drizzle icing over top!
10. ENJOY!! :)

Friday, December 16, 2011

peanut.butter.nutella.swirl.cookies

5 semesters down, 3 to go!! I just finished up my finals this week and I cannot believe I am halfway through my junior year of nursing school! Due to this extremely physically, emotionally, and most of all mentally demanding week, I have put off posting this blog...which is now a little past due.


Back in November, I registered for a nation-wide cookie swap where I got matched with three people to send a dozen cookies to. In return, I got a dozen cookies sent to me from three different people. For my end of the swap, I made peanut butter nutella swirled cookies! My dad especially enjoyed them. What I loved most about this swap was getting to share my cookies with a few strangers. I also liked that I found a few more blogs to my list!! I hope that my receivers enjoyed their cookies as much as I enjoyed baking them! :) Merry Christmas, baking world!


Peanut Butter Nutella Swirl Cookies 
adapted from: ericasweettooth.com

1/2 cup unsalted butter, at room temperature
3/4 cup smooth peanut butter
1/2 cup granulated sugar
1/2 cup packed light brown sugar
1 egg
3/4 tsp vanilla extract
3/4 tsp baking soda
1/4 tsp salt
1 3/4 cups flour
1/3 cup nutella

1. Preheat oven to 350 degrees.
2. In the bowl of an electric mixer, beat together butter, peanut butter, and sugars until light and fluffy, about 2-3 minutes.
3. Add in the egg and vanilla and beat until well combined.
4. In a separate bowl, whisk together flour, baking soda, and salt. With mixer on low, slowly incorporate the dry ingredients into the butter mixture until just combined.
5. Microwave Nutella for 20 seconds and then drizzle over the dough. Fold in Nutella with a spatula until well-distributed throughout the dough.
6. Chill the dough in the fridge for 15 minutes and then roll small balls by hand.
7. Place about an inch apart on a parchment paper-lined cookie sheet and use a fork to press down the balls slightly.
8. Bake until the edges are lightly browned, about 8-10 minutes.
9. Allow cookies to cool on the pan for 2 minutes, and then transfer to a cooling rack to cool completely.
10. ENJOY! :)

Thursday, August 18, 2011

wedding.sugar.cookies


I've recently expanded my baking abilities and gotten a bit more creative, decorating wise. I made and decorated these sugar cookies for my sister's bridal shower. I got the idea from a search I did on google images. Basically, I just frosted them and then piped the detail on. Simple enough, right? :)

Saturday, August 13, 2011

cupcake.cake.balls


Apparently this blog served as procrastination from nursing school, judging by my activity on here during the summer. Oops! While I did bake this summer, my fault came from not taking picture and posting them. Here is something I made back in June for  my little cousins kindergarten graduation (so cute!). He loves "Cayla's cake balls" and he even helped me make them one day this summer. He is quite the little chef! I decided to step it up a little and not just dip my cake balls, but to make them into these cute little cupcakes! I also found this clear paint can at Michael's, so I decided to package them up and slapped a few curled ribbons on it! :) 
Here is the final product:
(I guess I should add his school colors are green and white)


CAKE BALLS

1 cake mix (prepared)
1 can cream cheese icing (NOT WHIPPED! It also helps if you refrigerate it first)
1 pkg almond bark or enough chocolate chips to dip the cake balls
sprinkles, extra chocolate, etc. to decorate with


1. Prepare cake mix according to directions of box and let cool completely.
2. Crumble cake into a large mixing bowl. (I usually accomplish this by cutting the cake into small pieces and then using my hands...also a fun way the kids can get help!)
3. Mix in cream cheese icing.
4. Refrigerate for at least 1 hour.
5. Roll into 1-inch balls and place on cookie sheet lined with wax paper. (I usually refrigerate after this step too to help the balls set up more, but if you are in a hurry you don't have to)
6. Dip cake balls into chocolate! (Yummy!)
7. Decorate with sprinkles or drizzle with chocolate.
8. ENJOY! :)


For cupcake cake balls:
1. Follow steps 1-5.
2. Place a spoonful of milk chocolate (about half full) into peanut butter cup mold (pictured below).
3. Press cake ball into milk chocolate.
4. Let set up or refrigerate for a few minutes.
5. Remove from mold.
6. Dip the naked half of the cake ball into colored chocolate.
7. Decorate with sprinkles or drizzle with chocolate.
8. ENJOY! :)


<--Peanut Butter Cup Mold

Sunday, May 1, 2011

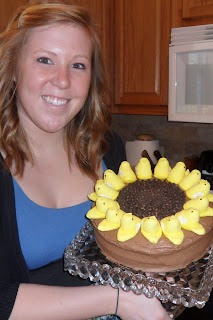
sunflower.cake


For lent this year, I gave up the most precious, enjoyed piece of my life...chocolate! Ok, so maybe a little dramatic, but chocolate is up there. This cake was my celebration of making it from Ash Wednesday to Easter Sunday without chocolate (except for the accidental mocha frappe...oops!). Quite an accomplishment I might add! So, I guess I should add something about the baking now. But...um...here's the thing, I cheated and used a box mix. (insert moment of shame here) And I wish the Peep sunflower decoration was my idea, but again I cheated and copied a recipe off of my favorite website to browse while in class, tasteofhome.com. Sometimes a baker takes the easy way out...especially if she has nursing finals the next two days!   

Sunday, April 3, 2011

oreo.truffles+peanut.butter.balls


I took a foods class in high school (three years worth of them to be exact). We took a field trip to a local candy shop during class one day and I was fascinated.  The owner was so well versed on the history of chocolate and he knew so many secrets to make chocolate "obey."  He taught us about tempering chocolate (adding extra chips of chocolate to the already melted chocolate to help it set up better). Who knew? These candies aren't as complicated as those made at the factory, but they are delicious! Enjoy!  

OREO TRUFFLES

1 pkg. (8 oz.) Cream Cheese, softened
1 pkg. (16.6 oz.) Double Stuffed Oreo Cookies, finely crushed
1 pkg. White Chocolate Bark
Decorations (Oreo crumbs, milk chocolate, sprinkles...get creative!)

1. Place Oreos in food processor and blend until fine crumbs
2. Mix cream cheese and Oreo crumbs together until well blended.
3. Shape into 1-ince balls. (place in fridge for one hour or until Oreo balls have hardened enough for dipping)
4. Melt White Chocolate Bark
5. Dip Oreo balls into melted white chocolate and place on wax papered covered baking sheet.
6. Once white chocolate has set up you can decorate how ever you want!
7. Enjoy!
(
best stored in air-tight container the refrigerator)

PEANUT BUTTER BALLS
From: A recipe in my mothers recipe box

2 cups creamy peanut butter
1/4 cup unsalted butter, room temperature
1/4 teaspoon salt
1/2 teaspoon pure vanilla extract
2 - 2 1/2 cups powdered sugar
(I used 2 1/2)
2 pkgs milk chocolate chips

1. Cream peanut butter and butter together.
2. Add salt.
3. Add vanilla.
4. Gradually add powdered sugar (1/2 cup at a time) until it comes together (and looks like the inside of of a reeces cup...yum!)
5. Form into 1-inch balls.
6. Place in the refrigerator for 1-2 hours.
7. Melt milk chocolate chips.
8. Using tooth pick, dip peanut butter balls into melted chocolate.
9. Enjoy!
(best stored in air tight container in refrigerator)

Saturday, March 26, 2011

blueberry.scones


Inspired by Twils:
Why do I bake? Hmmm...part of me uses baking as a stress reliever, but the biggest reason I bake is not for personal satisfaction or gain, but for others. You could say baking is my love language. Even though cranking up the mixer, preheating the oven, and blaring music might start out as a stress reliever, I get my biggest satisfaction from seeing other people enjoying my "lovin' from the oven." One of my friends (lets call him/her Twils) does not like chocolate. Who doesn't like chocolate?!?! I like chocolate so much I gave it up for lent. Anyways, I always feel bad when Twils doesn't eat whatever I make because it contains chocolate, hence my recent attempt at scones. Let me see if I can make his/her feeling about scones into a nursing diagnosis to paint a better picture. At risk for upset stomach r/t an infatuation for scones AEB eating four HUGE scones within 15 minutes...yeahhhh! Apparently they were a success! 


BLUEBERRY SCONES

2 cups flour
1/3 cup sugar
2 teaspoons baking powder
1/8 teaspoon salt
6 tablespoons chilled, unsalted butter, cut into pieces
1 cup fresh blueberries
1 large egg, lightly beaten
1 teaspoon pure vanilla extract
1/2 cup milk or cream (I used 1% milk)

1. Preheat oven to 400 degrees F.
2. In large bowl, whisk together flour, sugar, baking powder and salt.
3. Cut the butter into small pieces and blend into the flour mixture with pastry blender or two knives. (It should look like coarse crumbs after you are done)
4. Gently fold in the blueberries.
5. In small measuring up combine the cream/milk, beaten egg, and vanilla extract.
6. Make a well in dry ingredients mixture and pour egg and milk mixture into that well. (A well is when you push all of the dry ingredients to the outside edges of the bowl all most to the point where you can see the bottom of the bowl at the bottom.)
7. Stir with wooden spoon until all ingredients are combined. (DO NOT OVER MIX--this causes the scones to turn out tough. This is just like making muffins. You want to see some of the flour mixture not all the way combined. This will create a nice fluffy scone as opposed to a dense one.)
8. Transfer the dough to a lightly floured surface and knead the dough gently and then pat the dough into a circle that is about 7 inches round. (When kneading the dough, it is helpful to coat your hands with flour as well.)
9. Cut the circle in half, then cut each half into four pie-shaped wedges (triangles). Place the scones on the baking sheet.
10. Dust scones with sugar. 
11. Bake scones until nicely browned, about 18-22 minutes, turning baking sheet around half way though the time. (You can test to see if they are done with a toothpick if needed).
12. Enjoy! :)

For those non-scone eaters a scone is a mix between a muffin and a cookie. You can add any mix-in to scones to alter the flavor. I want to experiment with cinnamon apple, but I have had no time to go scout out a good place to buy cinnamon chips at...maybe this summer when I have time to breathe! 
Original Recipe can be found at: www.joyofbaking.com/SconesIntroduction

Sunday, March 13, 2011

nutella.blossoms


Lately, I have developed an infatuation with baking with Nutella. I was looking at baking websites during night class and found a recipe for Nutella chocolate chip cookies, which were a huge hit amongst friends and family. I wanted to make my own recipe with Nutella, so here it is! Introducing Nutella Blossoms (a take from Jif Peanut Butter Blossoms).

NUTELLA BLOSSOMS
  • 1/2 cup Crisco Butter Flavored Shortening
  • 3/4 cup Nutella
  • 1/4 cup firmly packed light brown sugar
  • 1 large egg
  • 2 tablespoons milk
  • 1 teaspoon vanilla extract
  • 1 1/2 cups flour
  • 1 teaspoon baking soda
  • 1/2 teaspoon salt
  • Extra sugar for rolling balls in
  • 48 foil-wrapped Hugs, unwrapped (I usually freeze them first so they keep their form)

1. Preheat oven to 275.
2. Mix flour, baking soda, and salt together. Set aside.
3. Cream together shortening and Nutella.
4. Add light brown sugar.
5. Add egg. Beat well.
6. Add milk and vanilla extract. 
7. Gradually add flour, baking soda, and salt mixture.
8. Roll dough into 1 inch balls and coat them in extra sugar.
9. Bake a dozen at a time for 8-10 minutes, turning cookie sheet halfway.
10. Let cool for 1 minute after removing cookies from oven.
11. Place Hug in center of cookie. Let them cool for 5 more minutes on cookie sheet.
12. Move cookies to cooling rack.
13. Enjoy! :)


Sunday, March 6, 2011

my.cookie.jar

I was a strange child; a little chubby, a little weird, and quiet (in public).  Being a little chunker when I was little, I was a bit obsessed with meals and well, food in general. Before meals, my family would always pray for the "hands that prepared this food."  I remember thinking, "Hey, I want my hands to be prayed for!"  Hence, my obsession with baking started.

I have been wanting to start a baking blog for awhile, but I'm currently a slave to nursing school. I'm not sure how often I will get to post on this blog, but here is my attempt.  It may be a slow start, but an attempt none the less.

So here we go...first baking post to come soon! Stay tuned! :)